Introduction
Welcome to the Apache Arrow guide for the Rust programming language. This guide was created to help you become familiar with the Arrow crate and its functionalities.
What is Apache Arrow?
According to its website Apache Arrow is defined as:
A language-independent columnar memory format for flat and hierarchical data, organized for efficient analytic operations on modern hardware like CPUs and GPUs. The Arrow memory format also supports zero-copy reads for lightning-fast data access without serialization overhead.
After reading the description you have probably come to the conclusion that Apache Arrow sounds great and that it will give anyone working with data enough tools to improve a data processing workflow. But that's the catch, on its own Apache Arrow is not an application or library that can be installed and used. The objective of Apache Arrow is to define a set of specifications that need to be followed by an implementation in order to allow:
- fast in-memory data access
- sharing and zero copy of data between processes
Fast in-memory data access
Apache Arrow allows fast memory access by defining its in-memory columnar format. This columnar format defines a standard and efficient in-memory representation of various datatypes, plain or nested (reference).
In other words, the Apache Arrow project has created a series of rules or specifications to define how a datatype (int, float, string, list, etc.) is stored in memory. Since the objective of the project is to store large amounts of data in memory for further manipulation or querying, it uses a columnar data definition. This means that when a dataset (data defined with several columns) is stored in memory, it no longer maintains its rows representation but it is changed to a columnar representation.
For example, lets say we have a dataset that is defined with three columns named: session_id, timestamp and source_id (image below). Traditionally, this file should be represented in memory maintaining its row representation (image below, left). This means that the fields representing a row would be kept next to each other. This makes memory management harder to achieve because there are different datatypes next to each other; in this case a long, a date and a string. Each of these datatypes will have different memory requirements (for example, 8 bytes, 16 bytes or 32 bytes).
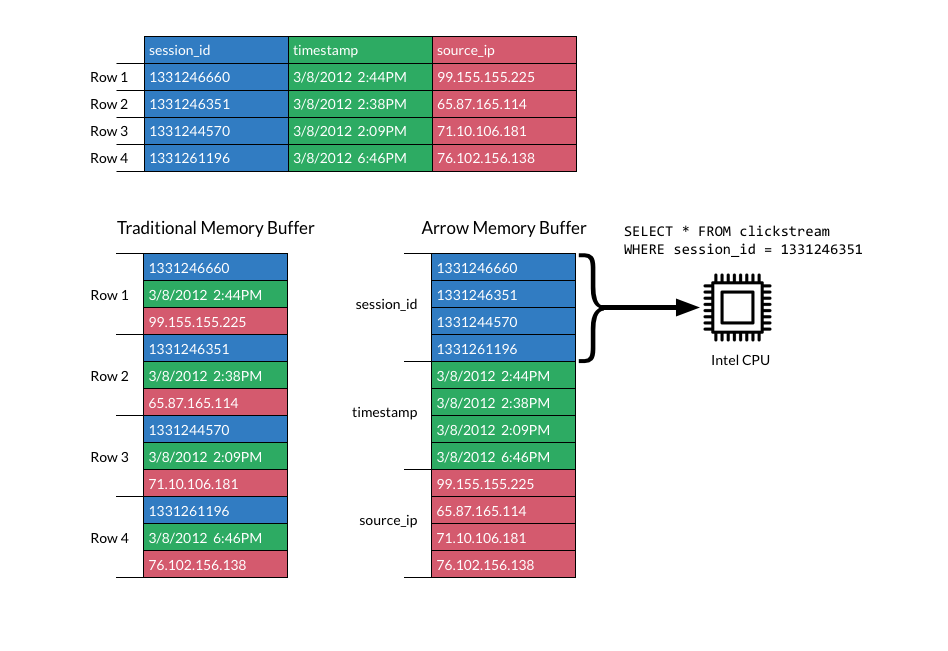
By changing the in memory representation of the file to a columnar form (image above, right), the in-memory arrangement of the data becomes more efficient. Similar datatypes are stored next to each other, making the access and columnar querying faster to perform.
Sharing data between processes
Imagine a typical workflow for a data engineer. There is a process that is producing data that belongs to a service monitoring the performance of a sales page. This data has to be read, processed and stored. Probably the engineer would first set a script that is reading the data and storing the result in a CSV or Parquet file. Then the engineer would need to create a pipeline to read the file and transfer the data to a database. Once the data is stored some analysis is needed to be done on the data, maybe Pandas is used to read the data and extract information. Or, perhaps Spark is used to create a pipeline that reads the database in order to create a stream of data to feed a dashboard. The copy and convert process may end up looking like this:
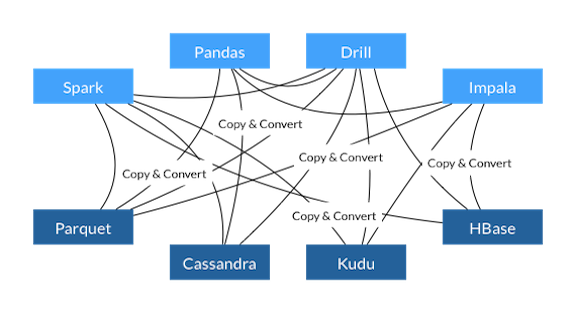
As it can be seen, the data is copied and converted several times. This happens every time a process needs to query the data.
By using a standard that all languages and processes can understand, the data doesn't need to be copied and converted. There can be a single in-memory data representation that can be used to feed all the required processes. The data sharing can be done regarding the language that is used.
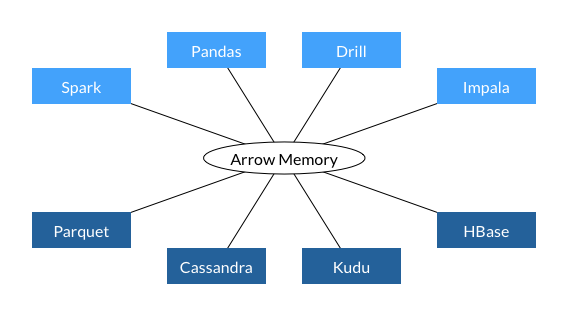
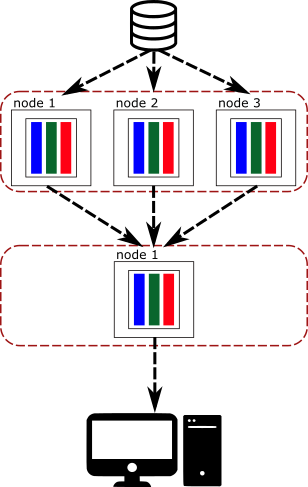
And thanks to this standardization the data can also be shared with processes that don't share the same memory. By creating a data server, packets of data with known structure (RecordBatch) can be sent across computers (or pods) and the receiving process doesn't need to spend time coding and decoding the data to a known format. The data is ready to be used once its being received.
The Rust Arrow crate
These and other collateral benefits can only be achieved thanks to the work done by the people collaborating in the Apache Arrow project. By looking at the project github page, there are libraries for the most common languages used today, and that includes Rust.
The Rust Arrow crate is a collection of structs and implementations that define all the elements required to create Arrow arrays that follow the Apache Arrow specification. In the next sections the basic blocks for working with the crate will be discussed, providing enough examples to give you familiarity to construct, share and query Arrow arrays.
Arrays
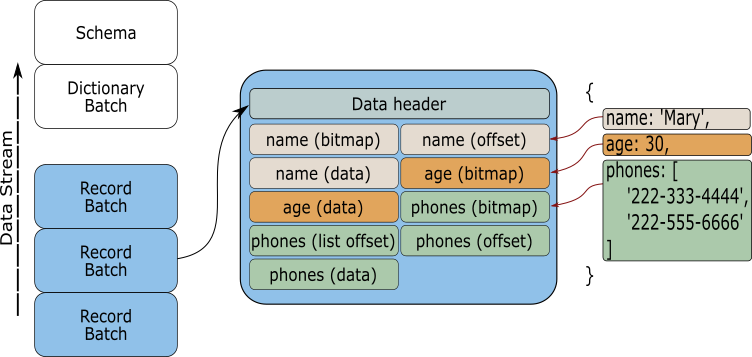
The Array is the center piece of the Rust Apache Arrow implementation. An array is defined by different pieces of data and metadata, as it can be seen in the next image.

From the image it can be seen that an Array is composed of one or more buffers, a validity bitmap and a datatype definition. By using an Arrow Array, you can map complex or nested data structures into memory, and with the data ordered and loaded you can shared it across several processes using a RecordBatch.
In Rust, the Array trait is the building block for all the available types of data containers. These include:
-
BinaryArray An array where each element is a byte whose maximum length is represented by a i32.
-
DictionaryArray A dictionary array where each element is a single value indexed by an integer key
-
FixedSizeBinaryArray A type of FixedSizeListArray whose elements are binaries.
-
FixedSizeListArray A type of FixedSizeListArray whose elements are binaries.
-
LargeBinaryArray An array where each element is a byte whose maximum length is represented by a i64.
-
LargeListArray A list array where each element is a variable-sized sequence of values with the same type whose memory offsets between elements are represented by a i64.
-
LargeStringArray An array where each element is a variable-sized sequence of bytes representing a string whose maximum length (in bytes) is represented by a i64.
-
ListArray A list array where each element is a variable-sized sequence of values with the same type whose memory offsets between elements are represented by a i32.
-
PrimitiveArray Array whose elements are of primitive types.
-
StringArray An array where each element is a variable-sized sequence of bytes representing a string whose maximum length (in bytes) is represented by a i32.
-
StructArray A nested array type where each child (called field) is represented by a separate array.
-
NullArray An Array where all elements are nulls
-
UnionArray An Array that can represent slots of varying types.
Each of these containers follow a set of rules in order to define some sort of behaviour. For example, a PrimitiveArray is made out of elements of the same datatype and it contains one data buffer and one validity buffer. Or a StructArray is a nested Array containing child fields that represent separate PrimitiveArrays. By using a combination of these arrays the user is capable of storing a variety of data in memory.
Tip. To have a better idea of the components that make each of the mentioned arrays and how they work together have a look at this section of the columnar format.
Given the different components that define an array, it is important to understand the basic unit that allocates the required memory used to hold data; the buffer.
The Arrow Buffer
The Buffer is the main data container in the Arrow Array. Depending on the type of array that is being created, it can have one or many buffers holding information. So, this means that an array could include a combination of a values buffer, a validity bitmap buffer and an offset buffer.
However, all buffers are the same. A buffer is the representation of a continuous memory region that is used to store data in memory. According to the Arrow specification a buffer should be aligned and padded using multiples of 8 or 64 bytes.
To see how a buffer looks in Rust lets create one.
use arrow::buffer::Buffer;

fn main() {
    let buffer_u8 = Buffer::from(&[0u8, 1, 2, 3, 4, 5]);
    println!("{:?}", buffer_u8);
}
Note. Don't use the "Run this code" button. The Arrow crate is not loaded in the book and it will produce an error
Tip. If you use "{:#?}" in the println! macro you should see a formated version of the struct in your screen
If you printed the previous code you should see something like this:
Buffer {
    data: Bytes {
        ptr: 0x1dcab5b5400,
        len: 6,
        data: [0, 1, 2, 3, 4, 5]
    },
    offset: 0
}
As it can be seen, a buffer is made out of a Bytes structure and an offset. The Bytes structure is used to represent the data in memory by using a pointer, the number of elements it has, and the data itself. The offset is used by the arrays to indicate an offset for reading the stored values. By creating a buffer the constructor has allocated in memory enough bytes to store the supplied values and it has given a pointer to access the stored data. It should also be noted that the resulting buffer is immutable.
The normal usage of the Arrays don't require you to use pointer arithmetic to access the data in the buffer, but as a learning experience lets use the pointer to access the data in memory.
use arrow::buffer::Buffer;

fn main() {
    let buffer_u8 = Buffer::from(&[0u8, 1, 2, 3, 4, 5]);

    unsafe {
        for i in 0..5 {
            println!("{}", *buffer_u8.as_ptr().add(i));
        }
    }
}
If you are following the examples, you should see printed the values 0 to 5 in you screen.
Now lets change the type of elements the buffer is holding to u32 and see what happens to the buffer.
use arrow::buffer::Buffer;
use arrow::datatypes::ToByteSlice;

fn main() {
    let buffer_u32 = Buffer::from(&[0u32, 1, 2, 3, 4, 5].to_byte_slice());

    println!("{:?}", buffer_u32);
}
In this case a new element is introduced to the code; the ToByteSlice trait. The ToByteSlice trait exposes the method to_byte_slice for [T] and T which allows us to allocate the required memory using u8 as the base unit. This means that now each u32 number will be represented by four u8 numbers. That can be seen better by printing the new buffer:
Buffer {
    data: Bytes {
        ptr: 0x1ad7d5ffb00,
        len: 24,
        data: [0, 0, 0, 0, 1, 0, 0, 0, 2, 0, 0, 0, 3, 0, 0, 0, 4, 0, 0, 0, 5, 0, 0, 0]
    },
    offset: 0
}
Now the length of the buffer is 24, even though we stored only 6 digits, and there are extra zeros in the data array. What happened is that each of the u32 numbers is represented using multiples of u8 numbers. Now each number in the array is padded and aligned. Neat isn't it?.
Tip. Try increasing the number of values used to create the buffer to see what happens to the len. Also, try using numbers larger than 255 to see how the number representation changes in the data array.
Again, as a learning experience, you can use the raw pointer to access all the
elements from the buffer. However, since the buffer pointer is a *const u8
you need to cast it to a *const u32.
use arrow::buffer::Buffer;
use arrow::datatypes::ToByteSlice;

fn main() {
    let buffer_u32 = Buffer::from(&[0u32, 1, 2, 3, 4, 5].to_byte_slice());

    let ptr_32 = buffer_u32.as_ptr() as *const u32;
    unsafe {
        for i in 0..6 {
            println!("{}", *ptr_32.add(i));
        }
    }
}
With your newly earned understanding of how a buffers works, lets start creating Arrow arrays.
The Array Data
As we discussed before, an Arrow array is made out of several components and the way these elements are stored will define the type of array that is being created. In the Rust Arrow crate the ArrayData struct is the generic representation of the data stored in memory. All types of arrays are made or represented using an atomic reference to an ArrayData.
Let us understand how this struct represents an Arrow array by creating one by using the ArrayData::new implementation.
use arrow::buffer::Buffer;
use arrow::array::ArrayData;
use arrow::datatypes::DataType;

fn main() {
    let buffer_u8 = Buffer::from(&[0u8, 1, 2, 3, 4, 5]);
    let data = ArrayData::new(DataType::Int8, 6, None, None, 0, vec![buffer_u8], vec![]);

    println!("{:?}", data);
}
If you print the previous code you should see the next output
ArrayData {
    data_type: Int8,
    len: 6,
    null_count: 0,
    offset: 0,
    buffers: [
        Buffer {
            data: Bytes {
                ptr: 0x20300849b00,
                len: 6,
                data: [0, 1, 2, 3, 4, 5]
            },
            offset: 0
        }
    ],
    child_data: [],
    null_bitmap: None }
As you can see, to create the data (ArrayData::new) it was required to input the datatype to be stored, the number of elements in the array, a validity null buffer, an offset, a vector of buffers and child data. Each of these values is used to define attributes and operations in the arrays.
Lets begin with the type of data. Each Arrow Array can store different datatypes in memory as mentioned before. The available datatypes are defined using the enum DataType and it follows the Arrow specification on datatypes (see Scehma.fbs). The selection of the datatype is very important because, as we saw in the buffer chapter, the implementation needs to know what type of pointer to use in order to access the vales stored in memory.
The next element is the length of values stored in the data. This value indicates how many of the values available in the buffer will be considered in the array.
Note. Remember that the buffer doesn't store the values using their original datatype, instead it uses u8 types
Therefore, the data array "needs" to know how many of the values from the buffer it has to read. The offset has a similar use; it indicates the array offset to start reading the data.
Tip. Change the len and offset values from the constructor from the previous example to see what happens to the data array.
The null bitmap and null count are used to indicate if there are null values stored in the array and what their positions are. Have a read at this section of the Apache columnar format to understand how a null value is represented and stored in the data array.
Also, during the construction of the data array we introduce an vector of buffers to the constructor. As we mentioned before some arrays required more than one buffer to represent the data. For example, an array of strings requires a data buffer and an offset buffer (We'll see an example later).
The child data is used for nested arrays, such as a list array or a struct array. Each of them represent data collections that are composed of one or more primitive arrays.
Primitive Arrays
A primitive array (PrimitiveArray) is a type of array used to store a list of elements of the same type. It includes fixed bit-width, variable-size, binary and null arrays.
Lets begin with an example of a primitive array and how the data looks like when printed.
use arrow::buffer::Buffer;
use arrow::array::{ArrayData, PrimitiveArray};
use arrow::datatypes::{DataType, Int32Type, ToByteSlice};

use std::sync::Arc;

fn main() {
    let buffer = Buffer::from(&[0u32, 1, 2, 3, 4, 5].to_byte_slice());
    let data = ArrayData::new(DataType::Int32, 6, None, None, 0, vec![buffer], vec![]);

    let array: PrimitiveArray<Int32Type> = PrimitiveArray::<Int32Type>::from(Arc::new(data));
    println!("{:?}", array);
}
This time you should see in your console output something like this
PrimitiveArray<Int32>
    [ 0,
      1,
      2,
      3,
      4,
      5,
    ]
It seems that this time the primitive array knows how to represent the data that is stored in the buffer using the correct datatype. When we print the array we no longer see zeros padding the data (easier for us humans to understand, isn't it).
You may have noticed that we used the From trait in order to create the array from the ArrayData. Lucky for us, in the Arrow crate there are several ways to create arrays.
The array builders
Lets make our life simpler by using the constructors defined within the crate. This constructors will do all the job of defining the buffers, data arrays and datatypes. They will even help us define the validity buffer used to mark the presence of null values.
For this example we will use an Int32Builder which is a type definition created from PrimitiveBuilder
use arrow::array::Int32Builder;

fn main() {
    let mut primitive_array_builder = Int32Builder::new(20);

    primitive_array_builder.append_value(5).unwrap();
    primitive_array_builder.append_value(10000).unwrap();
    primitive_array_builder.append_value(2000000).unwrap();
    primitive_array_builder.append_null().unwrap();
    primitive_array_builder.append_slice(&[1, 2, 3]).unwrap();
    primitive_array_builder.append_null().unwrap();
    primitive_array_builder
        .append_slice(&(0..10).collect::<Vec<i32>>())
        .unwrap();

    let primitive_array = primitive_array_builder.finish();
    println!("{:?}", primitive_array);

}
As you can see, now the array was created in a more organic way. We didn't need to define all the elements that compose the array. This builder will let us add as many values as we need (thanks to the MutableBuffer that is used by the constructor). We can add values, slices and nulls in one go. When there are no more values to add, the builder will create a primitive array that represents all the data stored within the data buffer.
It should be mentioned that once the builder finishes the array, it will clear its memory and the builder can be used again to create another primitive array.
Note. The Arrow create also has BufferBuilders that behave like the array builders. They can be used to create buffers in a dynamic way by adding values as needed. The finish buffer can be used to create arrays of different types.
Using traits
We can also create arrays by using vectors of elements. This is thanks to the From trait implemented in the crate.
use arrow::array::{PrimitiveArray, Int32Array};
use arrow::datatypes::{Date64Type, Time64MicrosecondType};

fn main() {
    // Creating an array from a vector of options
    let array = Int32Array::from(vec![Some(0), None, Some(2), None, Some(4)]);
    println!("{:?}", array);

    // Creating an array from a vector of Date64Types using the into method
    let date_array: PrimitiveArray<Date64Type> =
        vec![Some(1550902545147), None, Some(1550902545147)].into();
    println!("{:?}", date_array);

    // Creating an array from a vector of Date64Types using the from method
    let date_array: PrimitiveArray<Date64Type> =
        PrimitiveArray::<Date64Type>::from(vec![Some(1550902545147), None, Some(1550902545147)]);
    println!("{:?}", date_array);

    let time_array: PrimitiveArray<Time64MicrosecondType> =
        (0..100).collect::<Vec<i64>>().into();
    println!("{:?}", time_array);
}
As you can see from these examples, it is relatively easy to create primitive arrays to store data in memory. The create has a variety of methods to store data in memory that follows the Arrow specification; all data is padded and aligned.
Also, since all the arrays store an atomic reference to the buffers, they can be shared between processes without copying the data. However, before we venture into data sharing is important to see how to create nested structures using primitive arrays and buffers.
Nested arrays
A primitive array is a useful struct to store values that have the same datatype. However, if we only use primitive arrays it will be impossible to represent complex data structures like datasets. For this reason nested arrays were introduced to the Apache Arrow specification, and in the Rust implementation we have variable size lists, fixed size lists and structs.
Variable size lists
A variable size list is used to represent arrays that are made of variable size lists. In Rust we have the next containers to create variable size lists:
Note. The difference between the Large and Normal arrays is the type of datatype offset used to align the space between elements. In the normal arrays the offset is represented using a i32 and in the large list a i64 is used.
Tip. For more details on how a variable size list is defined and created, it is recommended that you read this section of the Arrow columnar format.
ListArray
Lets continue this section by creating a ListArray to show you how to create a variable size list and how it is represented in memory. For reference, we will use the next image to explain how a ListArray is created and what is happening behind the scene.
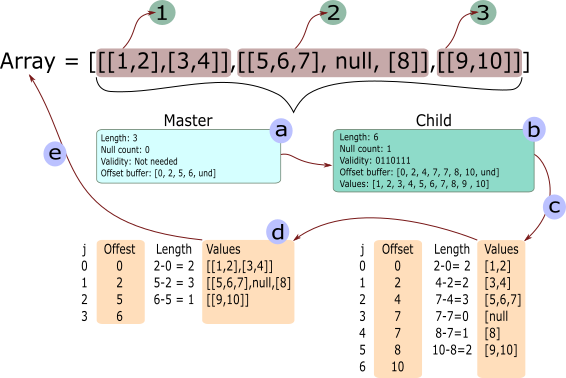
In this example we are going to create a list that is made of three elements. Each of these elements will me composed of one or more lists. For example, element 1 will have 2 lists; element 2 will have 2 lists and 1 null; and element 3 will have one list.
In general we can say that a nested array is made of a master data array and a series of child data arrays. In the previous image the master array (a) defines the general structure of the array, which in this case it has 3 elements, no nulls and has an offset buffer. The offset buffer is used to calculate how many numbers or elements each of the inner lists have.
After the master data array comes the child array (b). The child array is used to define the next nested level in the lists. In this case, the child array has 6 elements, one null, and offset buffer and a values buffer. By using this data representation one can nest as many lists as required. You only need to define a next child and attach it to the ListArray.
With this description in mind, lets create the list array from the image with the next code:
use arrow::buffer::Buffer;
use arrow::array::{ArrayData, ListArray};
use arrow::datatypes::{DataType, Field, ToByteSlice};

fn main() {
    // First we create an ArrayData struct that will hold the values
    // from the array. These values are stored in one buffer aligned and padded.
    let value_data = ArrayData::builder(DataType::Int32)
        .len(10)
        .add_buffer(Buffer::from(&[1, 2, 3, 4, 5, 6, 7, 8, 9, 10].to_byte_slice()))
        .build();

    // Second we define the offsets what will define the lists from the
    // child data(b)
    let value_offsets = Buffer::from(&[0, 2, 4, 7, 7, 8, 10].to_byte_slice());

    // With the values and offset we can define the child data(b). The child
    // data represents the second level in the array. Notice the type for
    // the data array. It is made using the enum DataType::List indicating
    // that its a composite array
    let list_data_type = DataType::List(Box::new(Field::new("item", DataType::Int32, false)));
    let list_data = ArrayData::builder(list_data_type)
        .len(6)
        .add_buffer(value_offsets)
        .add_child_data(value_data)
        .null_bit_buffer(Buffer::from([0b00110111]))
        .build();

    // The last element is the master data array. This master data
    // array holds all the information required to define the ListArray
    let value_offsets = Buffer::from(&[0, 2, 5, 6].to_byte_slice());
    let list_data_type = DataType::List(Box::new(Field::new("item", DataType::Int32, false)));
    let list_data = ArrayData::builder(list_data_type)
        .len(3)
        .add_buffer(value_offsets)
        .add_child_data(list_data)
        .build();

    // If you print the list_data you will only see the combination of
    // buffers that compose the data array
    println!("{:?}", list_data);

    // We need to define a ListArray to be able to understand the composed
    // data that is inside the ListArray
    let list_array = ListArray::from(list_data);
    println!("{:?}", list_array);
}
If you print the previous code you should see something like this (the output was formated for this book):
ListArray [
    ListArray [
        PrimitiveArray<Int32> [ 1, 2, ],
        PrimitiveArray<Int32> [ 3, 4, ],
    ],
    ListArray [
        PrimitiveArray<Int32> [ 5, 6, 7, ],
        null,
        PrimitiveArray<Int32> [ 8, ],
    ],
    ListArray [
        PrimitiveArray<Int32> [ 9, 10, ],
    ],
]
As you can see, the resulting array is identical to the one described in the previous image. Notice that by printing the ListArray we are able to see the real representation of the struct and not the buffers (values represented using u8). Behind the scenes the ListArray is doing the steps (c) and (d) from the image, which create the nested lists and show that data in the correct format and structure.
A ListArray is very flexible and by following this procedure is possible to create any type of nested lists.
Using the List builder
In order to make our life easier while creating a List Array we can use the ListBuilder and LargeListBuilder. By using these builders we no longer have to keep track of the three buffers that compose the List Array.
The next example shows how a list array can be created by just inserting values into it and selecting when a sub list starts and ends.
use arrow::array::{Int32Builder, ListBuilder};

fn main() {
    // List array with builder
    let values_builder = Int32Builder::new(10);
    let mut builder = ListBuilder::new(values_builder);

    //  [[0, 1, 2], [3, 4, 5], [6, 7]]
    builder.values().append_value(0).unwrap();
    builder.values().append_value(1).unwrap();
    builder.values().append_value(2).unwrap();
    builder.append(true).unwrap();
    builder.values().append_value(3).unwrap();
    builder.values().append_value(4).unwrap();
    builder.values().append_value(5).unwrap();
    builder.append(true).unwrap();
    builder.values().append_value(6).unwrap();
    builder.values().append_value(7).unwrap();
    builder.append(true).unwrap();
    let list_array = builder.finish();

    println!("{:?}", list_array);
}
StringArray
An String Array (StringArray and LargeStringArray) is used to represent a list of strings stored using the arrow format. A StringArray follows the same idea as a ListArray, the only difference is that the values buffer is made of u8s that represents the letters or characters.
As an example lets create an StringArray that holds the next list:
array = ["Hello", "from", null, "Apache", "Arrow"]
use arrow::buffer::Buffer;
use arrow::array::{ArrayData, StringArray};
use arrow::datatypes::{DataType, ToByteSlice};

fn main() {
    // First we define the values that will represent the letters
    // from the array
    let values: [u8; 20] = [
        b'h', b'e', b'l', b'l', b'o', b'f', b'r', b'o', b'm',
        b'A', b'p', b'a', b'c', b'h', b'e', b'A', b'r', b'r', b'o', b'w',
    ];

    // And the offset that represents how many characters are in each word
    let offsets: [i32; 6] = [0, 5, 9, 9, 15, 20];

    // By the way, notice the order each buffer is added to the ArrayData.
    // Each buffer is stored in a vector of buffers, so the only reference
    // other constructors will have is the vector index.
    let array_data = ArrayData::builder(DataType::Utf8)
        .len(5)
        .add_buffer(Buffer::from(offsets.to_byte_slice()))
        .add_buffer(Buffer::from(&values[..]))
        .null_bit_buffer(Buffer::from([0b00011011]))
        .build();
    let string_array = StringArray::from(array_data);

    println!("{:?}", string_array);
    println!("Value: {:?}", string_array.value(0));
    println!("Value: {:?}", string_array.value(1));
    println!("Value: {:?}", string_array.value(2));
}
Your output should look similar to this:
StringArray
    [ "hello", "from", null, "Apache", "Arrow", ]
Notice how when we print the string array the strings are printed as the should be and not as the u8 values stored in the buffer. This is thanks to the fact that a StringArray "knows" the type of data it holds and thus can represent the strings in the correct way. This can also be seen when the value() method is used on the string. The returned value is the correct representation of the word stored in the array.
Tip. From your code remove the null_bit_buffer method from the constructor and see how the empty space is now represented.
Using the String builder
Similar to the List Array, the construction of a String Array can become a bit complicated if we do it from scratch. You would have to split and put together all the letters from the list and then you would need to create an offset list for the words, plus adding the validity buffer. This would take a lot of time every time a new string array is required. For this reason, the StringBuilder and LargeStringBuilder where created.
Lets create a new String Array using an String Builder.
use arrow::array::StringBuilder;

fn main() {
    println!("Creating an String Array using builder");

    let mut builder = StringBuilder::new(10);
    builder.append_value("one").unwrap();
    builder.append_value("two").unwrap();
    builder.append_value("three").unwrap();
    builder.append_null().unwrap();
    builder.append_value("four").unwrap();

    let string_array = builder.finish();
    println!("{:?}", string_array);
}
As you can see, the creation process is more streamlined an it feels more natural. The builder will append the string and it will create the required buffers automatically.
Struct Array
StructArrays are used to represent mixed data, each being identified by a name and a datatype. As an example we have this array:
array = {
    "a": [false, null, null, null, true],
    "b": [null, 28, 42, null, null],
    "c": [1, 2, 3, 4, 5]
}
As it can be seen, each element in the array is represented by a tuple made of a name and an array of values. To construct an struct you will need to define the data that represents each of the fields. In the next node we will construct the previous array using the ArrayData builders we have been using.
use arrow::buffer::Buffer;
use arrow::array::{ArrayData, StructArray};
use arrow::datatypes::{DataType, Field, ToByteSlice};

fn main() {
    // First we create all the base data that represents each of the elements
    // in the struct
    let boolean_data = ArrayData::builder(DataType::Boolean)
        .len(5)
        .add_buffer(Buffer::from([0b00010000]))
        .null_bit_buffer(Buffer::from([0b00010001]))
        .build();

    let int_data_b = ArrayData::builder(DataType::Int32)
        .len(5)
        .add_buffer(Buffer::from([0, 28, 42, 0, 0].to_byte_slice()))
        .null_bit_buffer(Buffer::from([0b00000110]))
        .build();

    let int_data_c = ArrayData::builder(DataType::Int32)
        .len(5)
        .add_buffer(Buffer::from([1, 2, 3, 4, 5].to_byte_slice()))
        .null_bit_buffer(Buffer::from([0b00011111]))
        .build();

    // The field types are used to indicate the type of data that each element
    // in the structarray has
    let mut field_types = vec![];
    field_types.push(Field::new("a", DataType::Boolean, false));
    field_types.push(Field::new("b", DataType::Int32, false));
    field_types.push(Field::new("c", DataType::Int32, false));

    let struct_array_data = ArrayData::builder(DataType::Struct(field_types))
        .len(5)
        .add_child_data(boolean_data.clone())
        .add_child_data(int_data_b.clone())
        .add_child_data(int_data_c.clone())
        .build();

    let struct_array = StructArray::from(struct_array_data);

    println!("{:?}", struct_array);
}
The output from the code should look like this:
StructArray [
    -- child 0: "a" (Boolean)
    PrimitiveArray<Boolean> [ false, null, null, null, true, ]
    -- child 1: "b" (Int32)
    PrimitiveArray<Int32> [ null, 28, 42, null, null, ]
    -- child 2: "c" (Int32)
    PrimitiveArray<Int32> [ 1, 2, 3, 4, 5, ]
]
StructArrays can also be constructed using the StructArray::from helper, which takes the underlying arrays and field types. In the next example we will construct this struct using the From trait.
array = {
    "b": [false, false, true, true],
    "c": [42, 28, 19, 31]
}
use arrow::array::{Array, BooleanArray, Int32Array, StructArray};
use arrow::datatypes::{DataType, Field};

use std::sync::Arc;

fn main() {
    let struct_array = StructArray::from(vec![
        (
            Field::new("b", DataType::Boolean, false),
            Arc::new(BooleanArray::from(vec![false, false, true, true])) as Arc<dyn Array>,
        ),
        (
            Field::new("c", DataType::Int32, false),
            Arc::new(Int32Array::from(vec![42, 28, 19, 31])),
        ),
    ]);

    println!("{:?}", struct_array);
}
The output should look like this:
StructArray [
    -- child 0: "b" (Boolean)
    PrimitiveArray<Boolean> [ false, false, true, true, ]
    -- child 1: "c" (Int32)
    PrimitiveArray<Int32> [ 42, 28, 19, 31, ]
]
So, from these examples you can see that a struct is the perfect candidate to represent in memory a dataframe. These dataframes can be shared, without copying the data, among processes in order to read and process the data. You could read a file and create a StructArray, and then pass a reference of such array to another process for further analysis. And since all data is following a columnar format, the dataframe is stored in memory in a very efficient way.
In the next chapter we are going to talk about the RecordBatch and how it can be used to share data between processes.
The RecordBatch
A RecordBatch is the last piece of the Arrow crate implementation. It could be said that is the main goal of the whole Arrow specification; a structure that holds together data and the metadata that describes it.
Have a look again at the image we saw in the introduction chapter.
Let us imagine that we are developing a service that, after executing a query, returns formatted data with the requested information. For this service to be efficient transferring data, the RecordBatch is an integral piece of the process. Since each parcel of data contains all the information required to be read and processed, any process receiving the data that "speaks" Arrow can take the collected data and work on it immediately. There is no cost encoding or decoding each parcel, it can be worked on it as soon as it is received.
We are going to cover how to transfer data in more detail in the IPC chapter, but for the moment just keep in mind that a RecordBatch is one of the keys for efficient data transfer.
Building a RecordBatch
We will begin our exploration into the RecordBatch with an small example. In this example we are going to create a record that will contain two columns; an index column and a fruits column.
use std::sync::Arc;

use arrow::{
    array::{Int32Array, StringArray},
    datatypes::{DataType, Field, Schema},
    record_batch::RecordBatch,
};

fn main() {
    let schema = Schema::new(vec![
        Field::new("index", DataType::Int32, false),
        Field::new("fruits", DataType::Utf8, false),
    ]);

    let a = Int32Array::from(vec![1, 2, 3, 4, 5]);
    let b = StringArray::from(vec!["apple", "banana", "pineapple", "melon", "pear"]);

    let record_batch =
        RecordBatch::try_new(Arc::new(schema), vec![Arc::new(a), Arc::new(b)]).unwrap();

    println!("{:#?}", record_batch);
}
If you run the example you should get something like this:
RecordBatch {
    schema: Schema {
        fields: [
            Field {
                name: "index",
                data_type: Int32,
                nullable: false,
                dict_id: 0,
                dict_is_ordered: false,
                metadata: None,
            },
            Field {
                name: "fruits",
                data_type: Utf8,
                nullable: false,
                dict_id: 0,
                dict_is_ordered: false,
                metadata: None,
            },
        ],
        metadata: {},
    },
    columns: [
        PrimitiveArray<Int32>
        [
          1,
          2,
          3,
          4,
          5,
        ],
        StringArray
        [
          "apple",
          "banana",
          "pineapple",
          "melon",
          "pear",
        ],
    ],
}
The Schema
Now, let us inspect the pieces we used to create the RecordBatch. The first new element that we will encounter is going to be the Schema struct.
    let schema = Schema::new(vec![
        Field::new("index", DataType::Int32, false),
        Field::new("fruits", DataType::Utf8, false),
    ]);
The Schema is used to describe the metadata that our little RecordBatch is going to hold, and it is going to be our first source of information for the stored data. Inside the Schema, each column has different properties that make them unique, e.g. name, data type, etc. In order to encapsulate this information we need to use the Field struct.
Each Field in the Schema is responsible for holding the name of the column, the data type, if the column is nullable, and additional metadata. The Field metadata can be anything extra that we may want to store and that will be useful when reading the data from the column.
The Schema struct also has the option to store extra metadata. For example, we can store the number of rows a column has for future reference, or the name of the file where the data comes from. Have a look to the next example:
use std::collections::HashMap;
use arrow::datatypes::{DataType, Field, Schema};

fn main() {
    // Creating a schema with metadata
    let field_a = Field::new("a", DataType::Int64, false);
    let field_b = Field::new("b", DataType::Boolean, false);

    let mut metadata: HashMap<String, String> = HashMap::new();
    metadata.insert("row_count".to_string(), "100".to_string());
    metadata.insert("file".to_string(), "example.csv".to_string());

    let schema = Schema::new_with_metadata(vec![field_a, field_b], metadata);

    println!("{:#?}", schema);
}
The RecordBatch data
The next piece of the RecordBatch is the data itself. This data comes from Arrow arrays created using the methods we saw in previous sections.
    let a = Int32Array::from(vec![1, 2, 3, 4, 5]);
    let b = StringArray::from(vec!["apple", "banana", "pineapple", "melon", "pear"]);

    let record_batch =
        RecordBatch::try_new(Arc::new(schema), vec![Arc::new(a), Arc::new(b)]).unwrap();
From this snippet we can see that two columns are created using the From trait implemented for Int32Array and StringArray.
The RecordBatch is finally constructed by passing the defined schema and a vector of the created data. However, it should be noticed that we are using an atomic reference (Arc) to the data and not the data itself, making the the RecordBatch thread safe and the data zero copy.
Constructing from an StructArray
Probably those that have just read the previous chapter would have noticed that a RecordBatch is very similar to an StructArray, and you are right. A StructArray is a collection of Arrow arrays identified using Field structs. Both share a similar data structure, and because of this similarity we can construct a RecordBatch from them.
Have a look at the next code:
use std::sync::Arc;

use arrow::{
    array::{ArrayRef, BooleanArray, Int32Array, StructArray},
    datatypes::{DataType, Field, Schema},
    record_batch::RecordBatch,
};

fn main() {
    let index = Arc::new(Int32Array::from(vec![0, 1, 2, 3]));
    let boolean_array = Arc::new(BooleanArray::from(vec![false, false, true, true]));
    let int_array = Arc::new(Int32Array::from(vec![42, 28, 19, 31]));

    let struct_array = StructArray::from(vec![
        (
            Field::new("index", DataType::Int32, false),
            index as ArrayRef,
        ),
        (
            Field::new("col_1", DataType::Int32, false),
            int_array as ArrayRef,
        ),
        (
            Field::new("col_2", DataType::Boolean, false),
            boolean_array as ArrayRef,
        ),
    ]);

    let record_batch = RecordBatch::from(&struct_array);
    println!("{:#?}", record_batch);
}
The output should look like this:
RecordBatch {
    schema: Schema {
        fields: [
            Field {
                name: "index",
                data_type: Int32,
                nullable: false,
                dict_id: 0,
                dict_is_ordered: false,
                metadata: None,
            },
            Field {
                name: "col_1",
                data_type: Int32,
                nullable: false,
                dict_id: 0,
                dict_is_ordered: false,
                metadata: None,
            },
            Field {
                name: "col_2",
                data_type: Boolean,
                nullable: false,
                dict_id: 0,
                dict_is_ordered: false,
                metadata: None,
            },
        ],
        metadata: {},
    },
    columns: [
        PrimitiveArray<Int32>
        [
          0,
          1,
          2,
          3,
        ],
        PrimitiveArray<Int32>
        [
          42,
          28,
          19,
          31,
        ],
        BooleanArray
        [
          false,
          false,
          true,
          true,
        ],
    ],
}
As you can see we can construct a RecordBatch easily from the Struct array. This is because the From trait is implemented for the RecordBatch.
Nested structures
To finish this section, we are going to see how to create a nested structure using the tools that can be found within the RecorBatch struct. As you will see the procedure is fairly straight forward, all we have to do is to define the StructArray with all its columns and then add it to the schema as it is another column of the RecordBatch.
The next snippet of code shows an example of how a nested structure could look by introducing a Struct Array as one of the columns in the RecordBatch. The resulting RecordBatch will have two columns; one called id and a another called nested.
use std::sync::Arc;

use arrow::{
    array::{Array, Float64Array, Int32Array, StringArray, StructArray},
    datatypes::{DataType, Field, Schema},
    record_batch::RecordBatch,
};

fn main() {
    let schema = Schema::new(vec![
        Field::new("id", DataType::Int32, false),
        Field::new(
            "nested",
            DataType::Struct(vec![
                Field::new("a", DataType::Utf8, false),
                Field::new("b", DataType::Float64, false),
                Field::new("c", DataType::Float64, false),
            ]),
            false,
        ),
    ]);

    let id = Int32Array::from(vec![1, 2, 3, 4, 5]);

    let nested = StructArray::from(vec![
        (
            Field::new("a", DataType::Utf8, false),
            Arc::new(StringArray::from(vec!["a", "b", "c", "d", "e"])) as Arc<dyn Array>,
        ),
        (
            Field::new("b", DataType::Float64, false),
            Arc::new(Float64Array::from(vec![1.1, 2.2, 3.3, 4.4, 5.5])),
        ),
        (
            Field::new("c", DataType::Float64, false),
            Arc::new(Float64Array::from(vec![2.2, 3.3, 4.4, 5.5, 6.6])),
        ),
    ]);

    let record_batch =
        RecordBatch::try_new(Arc::new(schema), vec![Arc::new(id), Arc::new(nested)]).unwrap();

    println!("{:#?}", record_batch);
}
After running the previous code you should see something like this:
#![allow(unused)]
fn main() {
RecordBatch {
    schema: Schema {
        fields: [
            Field {
                name: "id",
                data_type: Int32,
                nullable: false,
                dict_id: 0,
                dict_is_ordered: false,
                metadata: None,
            },
            Field {
                name: "nested",
                data_type: Struct(
                    [
                        Field {
                            name: "a",
                            data_type: Utf8,
                            nullable: false,
                            dict_id: 0,
                            dict_is_ordered: false,
                            metadata: None,
                        },
                        Field {
                            name: "b",
                            data_type: Float64,
                            nullable: false,
                            dict_id: 0,
                            dict_is_ordered: false,
                            metadata: None,
                        },
                        Field {
                            name: "c",
                            data_type: Float64,
                            nullable: false,
                            dict_id: 0,
                            dict_is_ordered: false,
                            metadata: None,
                        },
                    ],
                ),
                nullable: false,
                dict_id: 0,
                dict_is_ordered: false,
                metadata: None,
            },
        ],
        metadata: {},
    },
    columns: [
        PrimitiveArray<Int32>
        [
          1,
          2,
          3,
          4,
          5,
        ],
        StructArray
        [
        -- child 0: "a" (Utf8)
        StringArray
        [
          "a",
          "b",
          "c",
          "d",
          "e",
        ]
        -- child 1: "b" (Float64)
        PrimitiveArray<Float64>
        [
          1.1,
          2.2,
          3.3,
          4.4,
          5.5,
        ]
        -- child 2: "c" (Float64)
        PrimitiveArray<Float64>
        [
          2.2,
          3.3,
          4.4,
          5.5,
          6.6,
        ]
        ],
    ],
}
}
As you can see, a RecordBatch is a very powerful structure that will let us put together the information we want to process or share. We are going to keep using it for different examples along this book.
Arrow Kernel s
The arrow crate defines several operations that can be performed on arrays. These include comparisons, aggregations, arithmetic operations, concatenations, and more.
In this chapter we will see some of the most common operations that can be performed on arrays.
Comparisons
Aggregations
Arithmetic operations
Concatenations
Arrow IPC (Interprocess communication)
In the previous section we have seen how to create Arrow arrays and batches using the Rust API. This data could have been created from a running process executing a query, and now it can be used for data analytics by any process that requested it. Or probably, the generated piece of data is just part of a bigger calculation that needs to be sent to other nodes to complete the distributed operation.
As you can see, the consumer of the data may not be in the same node and doesn't have access to the memory and the Arrow data. For this, and many other reasons, the producer needs a way to be able to send and share data with other processes.
Here is where the IPC specification starts to shine. In Arrow, the IPC is a standard specification that all implementations of Arrow follow so they can share data easily, and since all of them follow the same specification, there is no need to serialize and deserialize from one representation to another.
In this section we are going to see how data can be sent between processes using the available IPC API, either by storing the data in disk or by sending it through the wire. We are going to start by describing the protocols that Arrow uses to send information about the data and after that we are going to see some examples to move and share Arrow data.
Detour: Flatbuffers
Before we dive into the IPC and how data is shared between multiple process using Arrow's IPC, it is a good idea to get some understanding of what Flatbuffers is and how it is used to serialize and deserialize data.
If you are familiar with data serialization, then feel free to skip this chapter. We won't be discussing anything related to Arrow's IPC. This chapter will work as a basic introduction for those that are not familiar with the process and it will work as a foundation for understanding how data sharing works in Arrow.
What is data serialization?
Data serialization is the process of converting an object located in memory to a representation that can be understood by other processes, and it is done by converting the object to a series of bytes following some sort of contract that all processes understand.
So, imagine that we have a process that needs to send data to another process, it could be via disk or wire, it doesn't matter at the moment. What matters is that the data has to be in a format that both understand. Now, if the data that needs to be sent is an integer, like 20, then the producing server could send or store "10100" and since the receiver knows that the bytes that is receiving represent an integer then it can translate it back to 20. This processes was trivial for an integer, but it can become cumbersome when there are complex structures that need to be sent/receive.
This is why the serialization protocols where created. In Rust, we can use Serde to serialize/deserialize almost any structure under the sun. However, Arrow IPC uses Flatbuffers because it offers advantages that are beneficial to Arrow's IPC.
Flatbuffers
Flatbuffers is an open source project that was originally created for game development and other performance-critical applications. It is fast, memory efficient, and flexible. However, one of its best features is the fact that once an object has been serialized, the process reading the data doesn't need to unpack it back, it can extract information as soon as it has read the buffer.
Now, let us create a small example of data serialization by constructing a generic struct and sharing the serialized data using a TCP connection using rust std::net functions.
Installing the flatc compiler
Before you continue with the example you will need to install the flatc compiler.
If you are in OSX you can use:
brew install flatbuffers
In ubuntu:
sudo apt install -y flatbuffers-compiler
and in Windows
choco install flatbuffers
Or you can also install it from the source following these instructions
Struct serialization
In this example we are going to define a very simple schema that could represent a table, and that would be shared between different processes. For this example, the table schema definition will have a list of fields and each of these fields will be defined by a name and a type.
To start you will need to create the Flatbuffer objects that define our tables. Write the next code in a file, lets call it Schema.fbs
namespace MyStruct.Schema;

table Field {
    name:string;
    dtype:string;
}

table Schema {
    rows:long;
    fields:[Field];
}

root_type Schema;
As you can see we are creating two tables, Field and Schema. In Flatbuffers, a table is the way to define an object with multiple elements, and they can be composed of elements declared within the definition. In this case we are saying that a the table could have a certain number of rows and a list of Fields.
Note. The Flatbuffers specification has multiple types of labels that can be used to describe an object. For a detailed description of all the available types, you should have a lot at how to write a schema from the FlatBuffers project.
Now it is time to create the Rust file that will help us serialize and deserialize the data. Run the next command using the file you created previously.
flatc --rust Schema.fbs
This should generate a rust file with the same name as the file with the
Flatbuffer schema plus a _generated.rs postfix. Have a look at the file and
marvel at all the object definitions the flatc command created for us.
Creating a buffer
Now comes the interesting part, the serialization of the struct. Lets start by creating a constructor using the flatbuffers crate:
let mut builder = flatbuffers::FlatBufferBuilder::new_with_capacity(1024);
This builder will be in charge of creating the correct conversions between the rust objects and the Flatbuffer bytes representation.
Using the builder we can create two Field objects that will be added to the mini table schema object we want to create:
let field_1_name = builder.create_string("col_1");
let field_1_dtype = builder.create_string("int");
let field_1 = Field::create(
    &mut builder,
    &FieldArgs {
        name: Some(field_1_name),
        dtype: Some(field_1_dtype),
    },
);

let field_2_name = builder.create_string("col_2");
let field_2_dtype = builder.create_string("int");
let field_2 = Field::create(
    &mut builder,
    &FieldArgs {
        name: Some(field_2_name),
        dtype: Some(field_2_dtype),
    },
);

let fields = builder.create_vector(&[field_1, field_2]);
The builder has helped us to convert the strings that represent the name and dtype for each of the fields that will be part of the main mini schema that represents our table. Also, since the table schema is expecting these fields to be stored in a Flatbuffer vector, we use the builder to create the required object for the final table schema.
With all the information that defines the table schema converted we can create the final object. The new schema objet will look like this:
let schema = Schema::create(
    &mut builder,
    &SchemaArgs {
        rows: 100,
        fields: Some(fields),
    },
);
The final stage of the serialization process is to create the bytes buffer with the serialized object. This step is done in the next lines:
builder.finish(schema, None);
let buf = builder.finished_data();
Pat your self in the back, we are finally done. The object is serialized and it is ready to be shared with other processes that require this information.
Deserializing the buffer
To finish this example we are going to recover the information in the buffer by
reading the buffer using the root_as_schema function that was generated with
the flatc compiler.
let recovered_schema = root_as_schema(buf).unwrap();
println!("{:?}", recovered_schema.rows());

let recovered_fields = recovered_schema.fields().unwrap();
for f in recovered_fields {
    println!("{:?}", f.name());
    println!("{:?}", f.dtype());
}
As you can see, the serialization process is quite straight forward using the generated Flatbuffers objects, and the data deserialization is just as easy. The bytes received in the buffer don't need to be unpacked, and their information can be extracted soon as they are read.
In conclusion, in this small example we created a buffer of bytes that could define a table with information about its fields. The resulting buffer is easy to share with other processes, as it can be stored to disc or it can be shared via a tcp stream. A similar process is done in the IPC Arrow module, obviously with larger and more complex data structures. The schema information from the RecordBatch is serialized to be written to any available stream, e.g. disk writer or tcp writer. In the next chapter we are going to describe in more detail how a RecordBatch is serialized to be consumed by other processes.
Reading and writing files
Most of the data required to do analysis is either stored in a file or a database. For this reason it makes sense to cover the different methods available in the Rust Arrow implementation to extract and save information to a data file.
This section of the guide has three chapters discussing the available methods to read data stored in files. The types of files that we are going to cover are csv, json and parquet files. Hopefully by the end of this section you will be familiar enough with the available interfaces to interact with files.
Reading Parquet Files
A parquet file is a columnar storage format that is designed to efficiently store data in disk. Storing data using this format presents several advantages and you are invited to have a look a them and conclude if these format could be of use for your project.
In this chapter we are going to see how to open a parquet file using the parquet crate. The parquet crate is one of several crates that forms part of the Rust arrow suite. The reader that we are going to use from this crate reads a file in chunks and for each chunk it creates a RecordBach that can be consumed. As you will see with the example, these operations are fairly straight forward thanks to the parquet crate.
However, in order to make this chapter a bit more interesting, we are going to create a Table struct that can be used to read and write parquet files. The Table struct will implement some functions that will allow us to maintain information in memory for further use and to extract specific values from them either using an index or an iterator.
The data
The data that was used to test this code can be found from this page. If you want to use the same dataset you will need to download the "120 Years of Olimpic History" and convert it to a parquet file. The easiest way to do it is by loading the csv file using pandas (pandas.read_parquet) and save it with pandas (df.to_parquet).
Note. Keep in mind that the code that we are going to create can be used to read any parquet file. So don't worry if you are unable to convert the previously mentioned file. As long as you have a parquet file you are good to go.
The Table struct
The module that we are going to use to read the parquet is the parquet::arrow. This module already defines a reader that can be used to extract the information in chunks. However, since we want to keep the data in memory to use it for further analysis, we will create and compose a struct called Table.
The Table struct will maintain a vector with the information extracted from the parquet file and this data will be used to extract specific values from the columns.
use arrow::{
    record_batch::RecordBatch,
    datatypes::Schema,
};
use parquet::{
    arrow::{ArrowReader, ArrowWriter, ParquetFileArrowReader},
    file::reader::SerializedFileReader,
};
use std::sync::Arc;
use std::fs::File;
use std::path::Path;

// The Table struct. This object will represent the data read from the
// parquet files and it will be our entry point to any value in the file
pub struct Table {
    // We mantain a copy of the RecordBatch schema to keep handy the
    // file's metadata information.
    schema: Schema,
    data: Vec<RecordBatch>,
    rows: usize,
}

impl Table {
    pub fn read_parquet<T: AsRef<Path>>(path: T, chunk_size: usize) -> Self {
        // Using the parquet Arrow reader to extract batches of data
        // from the file to keep them in memory
        let file = File::open(path).unwrap();
        let file_reader = SerializedFileReader::new(file).unwrap();
        let mut arrow_reader = ParquetFileArrowReader::new(Arc::new(file_reader));

        let schema = arrow_reader.get_schema().unwrap();
        let record_batch_reader = arrow_reader.get_record_reader(chunk_size).unwrap();
        let mut data: Vec<RecordBatch> = Vec::new();

        let mut rows = 0;
        for maybe_batch in record_batch_reader {
            let record_batch = maybe_batch.unwrap();
            rows += record_batch.num_rows();

            data.push(record_batch);
        }

        Self { schema, data, rows }
    }

    // Simple writer to store the table data into a parquet file
    pub fn to_parquet<T: AsRef<Path>>(&self, path: T) {
        let file = File::create(path).unwrap();
        let mut writer = ArrowWriter::try_new(file, Arc::new(self.schema.clone()), None).unwrap();

        for batch in self.data.iter() {
            writer.write(&batch).unwrap();
        }

        writer.close().unwrap();
    }

    pub fn schema(&self) -> &Schema {
        &self.schema
    }

    pub fn data(&self) -> &Vec<RecordBatch> {
        &self.data
    }

    pub fn rows(&self) -> usize {
        self.rows
    }
}

fn main() {
    let table = Table::read_parquet("data/olympics.parquet", 2000);
    println!("Number of rows: {}", table.rows())
}
The most important functions from the struct are the read_parquet and to_parquet. These represent the backbone used to manipulate parquet files. In the read_parquet function we are reading the file in chunks or batches using the ParquetFileArrowReader. These batches, which are stored in a vector called data, will be our reference for the next functions that we are going to implemented on Table. To write data back to a parquet file we are using the ArrowWriter struct, which writes the data to the desired path. As you can see, the parquet crate has everything we need to read from and store data in parquet files. That is very convenient and helpful.
To make the Table struct a bit useful for further work, we are also keeping a copy of the RecordBatch schema in the table. This will make our life easier whenever we want to extract the file's metadata. We also added some helper functions in order to make the Table object a bit more useful.
Go ahead and compile this struct together with the main function to read and write a parquet file.
Well, writing and reading data wasn't that hard. That's thanks to the great work put into the parquet crate. Now, since we have created Table to read the files, lets continue by giving it a bit more functionality to learn more about the Arrow datatypes.
Getting a value
Here comes the interesting part of the Table struct; to extract a value from the RecordBatches. One could be tempted to simply use the vector holding the RecordBatches and try to read the values from there. Let say we could use an index to select a RecordBatch from the vector and then using the RecordBatch column method we could select a column from the RecordBatch. With the desired column available we could select any value from it. That sounds straight forward, right?. If only Rust were that simple.
One thing that should be noted from the RecordBatch column method is that the return signature is &ArrayRef which is an alias for and Arc<dyn Array>. This means that the method returns a reference to an object that implements dynamically the Array trait, not an explicit type of Arrow array. This does make sense, since the return column can be of any Arrow datatype, Rust needs to know dynamically if the values read from the column are an integer, float, string or a list.
That's why the Array trait is so useful in this case. It lets us work with any array that implements the Array trait without worrying about its specific type. However, this complicates our life because now we don't have an specific type of array and thus we can not extract a value with its type from the column. So, how are we going to access the real value from the columns?.
Enter the enums
One way in which we can access the data from any array that implements the Array trait is by using the as_any method available to us via the AsAny trait. The AsAny trait exposes the function dowcast_ref that, as long as it is possible, downcasts this generic array to the specific array. We can do this for any column we would like to read data from. This approach works but it is not the most flexible approach we can take.
Another thing we could do is to define an Enum that encapsulates all possible types that could be found when reading the file. The advantage of using an enum this way is that we can implement a unique function that converts or downcasts the returned array into each of the possible Arrow arrays types.
In order to be able to downcast the Array to the desired array type we are going to take advantage of the previously mentioned fact that the Array trait implements the AsAny trait for all the Arrow array types. This means that we will have to implement a function that downcasts an array based on the type of data stored in it. To make this repetitive processes not so tedious, we are going to help ourselves by writing these functions using a handy macro.
Have a look at the implementation of the enum ScalarValue
#![allow(unused)]
fn main() {
use arrow::{
    array::{
        Array, ArrayRef, BooleanArray, Date32Array, Float32Array, Float64Array, Int16Array,
        Int32Array, Int64Array, Int8Array, LargeStringArray, ListArray, StringArray, UInt16Array,
        UInt32Array, UInt64Array, UInt8Array,
    },
    datatypes::{DataType, DateUnit, Field, Schema, TimeUnit},
    record_batch::RecordBatch,
};

#[derive(Debug, Clone, PartialEq)]
pub enum ScalarValue {
    Boolean(Option<bool>),
    Float32(Option<f32>),
    Float64(Option<f64>),
    Int8(Option<i8>),
    Int16(Option<i16>),
    Int32(Option<i32>),
    Int64(Option<i64>),
    UInt8(Option<u8>),
    UInt16(Option<u16>),
    UInt32(Option<u32>),
    UInt64(Option<u64>),
    Utf8(Option<String>),
    LargeUtf8(Option<String>),
    List(Option<Vec<ScalarValue>>, DataType),
    Date32(Option<i32>),
    TimeMicrosecond(Option<i64>),
    TimeNanosecond(Option<i64>),
}

// Helper macro that is used to create the function that downcasts
// an array to the correct type of array. This is done thanks to all
// the defined Arrow data types.
macro_rules! typed_cast {
    ($array:expr, $index:expr, $ARRAYTYPE:ident, $SCALAR:ident) => {{
        let array = $array.as_any().downcast_ref::<$ARRAYTYPE>().unwrap();
        ScalarValue::$SCALAR(match array.is_null($index) {
            true => None,
            false => Some(array.value($index).into()),
        })
    }};
}

impl ScalarValue {
    pub fn try_from_array(array: &ArrayRef, index: usize) -> Result<Self, String> {
        Ok(match array.data_type() {
            DataType::Boolean => typed_cast!(array, index, BooleanArray, Boolean),
            DataType::Float64 => typed_cast!(array, index, Float64Array, Float64),
            DataType::Float32 => typed_cast!(array, index, Float32Array, Float32),
            DataType::UInt64 => typed_cast!(array, index, UInt64Array, UInt64),
            DataType::UInt32 => typed_cast!(array, index, UInt32Array, UInt32),
            DataType::UInt16 => typed_cast!(array, index, UInt16Array, UInt16),
            DataType::UInt8 => typed_cast!(array, index, UInt8Array, UInt8),
            DataType::Int64 => typed_cast!(array, index, Int64Array, Int64),
            DataType::Int32 => typed_cast!(array, index, Int32Array, Int32),
            DataType::Int16 => typed_cast!(array, index, Int16Array, Int16),
            DataType::Int8 => typed_cast!(array, index, Int8Array, Int8),
            DataType::Utf8 => typed_cast!(array, index, StringArray, Utf8),
            DataType::LargeUtf8 => typed_cast!(array, index, LargeStringArray, LargeUtf8),
            DataType::List(nested_type) => {
                let list_array = array
                    .as_any()
                    .downcast_ref::<ListArray>()
                    .ok_or_else(|| "Failed to downcast ListArray".to_string())?;
                let value = match list_array.is_null(index) {
                    true => None,
                    false => {
                        let nested_array = list_array.value(index);
                        let scalar_vec = (0..nested_array.len())
                            .map(|i| ScalarValue::try_from_array(&nested_array, i))
                            .collect::<Result<Vec<ScalarValue>, String>>()?;
                        Some(scalar_vec)
                    }
                };
                ScalarValue::List(value, nested_type.data_type().clone())
            }
            DataType::Date32(DateUnit::Day) => {
                typed_cast!(array, index, Date32Array, Date32)
            }
            other => {
                return Err(format!("Downcast not available for type: {}", other));
            }
        })
    }
}
}
The try_from_array function uses an array, which until this point we only know that is an object that implements dynamically the Array trait, and downcasts it to the correct Arrow array type. This is done thanks to the options defined in the ScalarValue enum and the Arrow implementation. Now, with this enum under our belt we can implement the missing functions in the Table struct.
The complete implementation
With the ScalarValue enum defined, we can write the missing function from Table; collect a value from a column. This missing function will extract a value from a column using an index and returns it with the correct type. Also, since it may be useful to have a way to loop though all the values in a column, we can implement the iterator trait for a column.
The final implementation of all the code is presented next.
use arrow::{
    array::{
        Array, ArrayRef, BooleanArray, Date32Array, Float32Array, Float64Array, Int16Array,
        Int32Array, Int64Array, Int8Array, LargeStringArray, ListArray, StringArray, UInt16Array,
        UInt32Array, UInt64Array, UInt8Array,
    },
    datatypes::{DataType, DateUnit, Field, Schema, TimeUnit},
    record_batch::RecordBatch,
};

use parquet::{
    arrow::{ArrowReader, ArrowWriter, ParquetFileArrowReader},
    file::reader::SerializedFileReader,
};

use std::fs::File;
use std::path::Path;
use std::sync::Arc;

#[derive(Debug, Clone, PartialEq)]
pub enum ScalarValue {
    Boolean(Option<bool>),
    Float32(Option<f32>),
    Float64(Option<f64>),
    Int8(Option<i8>),
    Int16(Option<i16>),
    Int32(Option<i32>),
    Int64(Option<i64>),
    UInt8(Option<u8>),
    UInt16(Option<u16>),
    UInt32(Option<u32>),
    UInt64(Option<u64>),
    Utf8(Option<String>),
    LargeUtf8(Option<String>),
    List(Option<Vec<ScalarValue>>, DataType),
    Date32(Option<i32>),
    TimeMicrosecond(Option<i64>),
    TimeNanosecond(Option<i64>),
}

macro_rules! typed_cast {
    ($array:expr, $index:expr, $ARRAYTYPE:ident, $SCALAR:ident) => {{
        let array = $array.as_any().downcast_ref::<$ARRAYTYPE>().unwrap();
        ScalarValue::$SCALAR(match array.is_null($index) {
            true => None,
            false => Some(array.value($index).into()),
        })
    }};
}

impl ScalarValue {
    pub fn try_from_array(array: &ArrayRef, index: usize) -> Result<Self, String> {
        Ok(match array.data_type() {
            DataType::Boolean => typed_cast!(array, index, BooleanArray, Boolean),
            DataType::Float64 => typed_cast!(array, index, Float64Array, Float64),
            DataType::Float32 => typed_cast!(array, index, Float32Array, Float32),
            DataType::UInt64 => typed_cast!(array, index, UInt64Array, UInt64),
            DataType::UInt32 => typed_cast!(array, index, UInt32Array, UInt32),
            DataType::UInt16 => typed_cast!(array, index, UInt16Array, UInt16),
            DataType::UInt8 => typed_cast!(array, index, UInt8Array, UInt8),
            DataType::Int64 => typed_cast!(array, index, Int64Array, Int64),
            DataType::Int32 => typed_cast!(array, index, Int32Array, Int32),
            DataType::Int16 => typed_cast!(array, index, Int16Array, Int16),
            DataType::Int8 => typed_cast!(array, index, Int8Array, Int8),
            DataType::Utf8 => typed_cast!(array, index, StringArray, Utf8),
            DataType::LargeUtf8 => typed_cast!(array, index, LargeStringArray, LargeUtf8),
            DataType::List(nested_type) => {
                let list_array = array
                    .as_any()
                    .downcast_ref::<ListArray>()
                    .ok_or_else(|| "Failed to downcast ListArray".to_string())?;
                let value = match list_array.is_null(index) {
                    true => None,
                    false => {
                        let nested_array = list_array.value(index);
                        let scalar_vec = (0..nested_array.len())
                            .map(|i| ScalarValue::try_from_array(&nested_array, i))
                            .collect::<Result<Vec<ScalarValue>, String>>()?;
                        Some(scalar_vec)
                    }
                };
                ScalarValue::List(value, nested_type.data_type().clone())
            }
            DataType::Date32(DateUnit::Day) => {
                typed_cast!(array, index, Date32Array, Date32)
            }
            other => {
                return Err(format!("Downcast not available for type: {}", other));
            }
        })
    }
}

pub struct Table {
    schema: Schema,
    data: Vec<RecordBatch>,
    rows: usize,
    // We keep the batch chunk size to calculate a relative index
    // to access the information from the data vector
    chunk_size: usize,
}

impl Table {
    pub fn read_parquet<T: AsRef<Path>>(path: T, chunk_size: usize) -> Self {
        let file = File::open(path).unwrap();
        let file_reader = SerializedFileReader::new(file).unwrap();
        let mut arrow_reader = ParquetFileArrowReader::new(Arc::new(file_reader));

        let schema = arrow_reader.get_schema().unwrap();
        let record_batch_reader = arrow_reader.get_record_reader(chunk_size).unwrap();
        let mut data: Vec<RecordBatch> = Vec::new();

        let mut rows = 0;
        for maybe_batch in record_batch_reader {
            let record_batch = maybe_batch.unwrap();
            rows += record_batch.num_rows();

            data.push(record_batch);
        }

        Self {
            schema,
            data,
            rows,
            chunk_size,
        }
    }

    pub fn to_parquet<T: AsRef<Path>>(&self, path: T) {
        let file = File::create(path).unwrap();
        let mut writer = ArrowWriter::try_new(file, Arc::new(self.schema.clone()), None).unwrap();

        for batch in self.data.iter() {
            writer.write(&batch).unwrap();
        }

        writer.close().unwrap();
    }

    pub fn schema(&self) -> &Schema {
        &self.schema
    }

    pub fn data(&self) -> &Vec<RecordBatch> {
        &self.data
    }

    pub fn rows(&self) -> usize {
        self.rows
    }

    // Function to get a value from a column in the table
    // The function will search in the batches from the data
    // vector and returns the selected value with its correct
    // datatype
    pub fn value(&self, column: usize, index: usize) -> Option<ScalarValue> {
        if column >= self.schema.fields().len() {
            return None;
        }

        let batch = index / self.chunk_size;
        if batch >= self.data.len() {
            return None;
        }

        let array = self.data[batch].column(column);
        let index_in_batch = index % self.chunk_size;

        ScalarValue::try_from_array(array, index_in_batch).ok()
    }


    pub fn column_iterator(&self, column: usize) -> ColumnIterator {
        ColumnIterator::new(column, &self.data)
    }
}

// Iterator to loop through all the values in a column using
// as return value a ScalarValue
pub struct ColumnIterator<'iter> {
    column: usize,
    data: &'iter [RecordBatch],
    index: usize,
    batch: usize,
}

impl<'iter> ColumnIterator<'iter> {
    pub fn new(column: usize, data: &'iter [RecordBatch]) -> Self {
        Self {
            column,
            data,
            index: 0,
            batch: 0,
        }
    }
}

impl<'iter> Iterator for ColumnIterator<'iter> {
    type Item = ScalarValue;

    fn next(&mut self) -> Option<Self::Item> {
        let records = self.data[self.batch].column(self.column).len();

        let (next_record, next_batch) = if self.index + 1 >= records {
            (0, self.batch + 1)
        } else {
            (self.index + 1, self.batch)
        };

        if next_batch >= self.data.len() {
            return None;
        }

        let array = self.data[self.batch].column(self.column);

        let value = ScalarValue::try_from_array(array, self.index).ok();

        self.index = next_record;
        self.batch = next_batch;

        value
    }
}

fn main() {
    let table = Table::read_parquet("data/olympics.parquet", 2000);

    let col_iter = table.column_iterator(0);

    for val in col_iter {
        if let ScalarValue::Int64(res) = val {
            println!("{:?}", res);
        }
    }
}
It should be noted that without the definition of the ScalarValue enum, it would have been impossible to keep the return value generic for any data type defined in the Arrow implementation. There was no way to create an specific Arrow datatype return value for this function. Well, maybe we could have done it with a new trait, but we would have had to do more work than the one we just did. The enum has saved our day.
Have fun compiling the code and testing reading and writing different parquet files.
Conclusion
From this and the previous examples that we saw in this section, we hope you get and idea of how you could use the Arrow implementation to read data from different type of files and use them for data analysis and calculations. As you can see, the Rust Arrow suite already has several methods and structs that make these operations simple to implement.
One thing that should be mention is that the implementation of the ScalarValue enum is a simplification of the approach used in the Datafusion crate. The objective of Datafusion is to create an interface for doing complex data operations using Arrow as the data backbone. It implements a DataFrame which is a more advanced and complex version of Table struct we just created in this example. It aims to become a Pandas analogue in Rust. We are going to discuss Datafusion in future chapters but before that, we are going to talk about IPC (interprocess communication) and how Arrow is used to share data between processes.